Thoughtful design can transform an online course from simply delivering content to creating meaningful learning. Teaching online presents unique challenges, but it also creates powerful opportunities to design engaging, flexible, and student-centered learning experiences.
Online learning is no longer a niche format. According to recent national data from National Center for Education Statistics, more than half of all college students in the United States now take at least one online course as part of their studies. Yet despite its prevalence, research consistently shows that student success in online courses often lags behind in-person learning when courses are not intentionally designed.
This makes effective online course design essential. Well-designed online courses don’t just replicate face-to-face instruction — they leverage the online environment to promote interaction, inclusion, and deeper learning. This resource will guide you through evidence-based practices to help you create an online course that supports student success and meaningful engagement.
Begin with learning, not tools.
When faculty begin designing an online course, it’s common to ask, “How can I do this online?” But when we start there, it’s easy to fall into the trap of trying to recreate face-to-face activities in an online format – which can feel limiting or frustrating.
A more effective approach is to start with a different question: “What do my students need to learn?” When learning goals drive your design decisions, it becomes easier to explore the possibilities of the online environment and create meaningful learning experiences.
Foundational principles of effective teaching apply across all modalities. The well-known work of Arthur W. Chickering and Zelda F. Gamson, published as Seven Principles for Good Practice in Undergraduate Education (1987), continues to guide quality teaching and course design today. Their principles encourage instructors to:
- Encourage interaction between students and instructors
- Promote collaboration among students
- Support active learning
- Communicate high expectations
- Encourage time on task
- Provide timely and meaningful feedback
- Respect diverse learners and learning approaches
Even decades later, these principles remain widely cited because they reflect what research consistently shows: effective teaching practices are not dependent on format – they are driven by intentional design.
Keep these principles in mind as you plan and refine your online course.
Preparing to Design Your Course
Start with what you already have.
Before you begin building your course, gather and organize all of your instructional materials. This might include syllabi, lecture notes, slides, readings, assignments, assessments, and any digital resources you’ve used in the past. You may also want to collect sample syllabi, discipline-specific resources, or shared materials from colleagues. Organizing these resources early will save time later and help you see what you already have and where there are gaps to fill.
Store these materials in a central, accessible location such as cloud storage or a dedicated course design folder so you can easily locate and update them as you design.
Set realistic goals and timelines.
Quality course design takes time. Whether you’re building a brand-new course or redesigning an existing one, set aside focused, uninterrupted time to plan and build. The time required will depend on the scope of the project, your goals, and your schedule, but having clear milestones and deadlines helps keep the process manageable and productive.
Begin with required course competencies.
Within Maricopa Community Colleges District, course-level competencies are developed by faculty at the district level and represent what must be taught in each course. These competencies provide the foundation for your course design.
As you plan, align your course components, activities, assessments, content, and interactions, with these competencies. Students typically build toward mastery through smaller steps, often articulated as module or unit-level learning objectives. These objectives help students understand what they will learn, how each activity supports that learning, and how everything connects across the course.
This alignment between competencies, objectives, and activities creates a coherent learning experience and helps students clearly see how their learning develops over time.
Course Competency
Course competencies describe desired learner mastery using terms that are specific and observable enough to be measured by the instructor. At some institutions, these can be called different things. In Maricopa we call them Course competencies.
Module Level Learning Objective
Learning objectives at the module level align with and are more specific than course competencies. The module learning objectives describe learner mastery in specific, observable terms and in smaller, discrete pieces. These precisely describe the specific skills and knowledge learners are able to master and demonstrate at regular intervals throughout the course.
Phase 1: Map the Course
Start by reviewing the most current course competencies on the Maricopa Community Colleges District Curriculum & Transfer website.
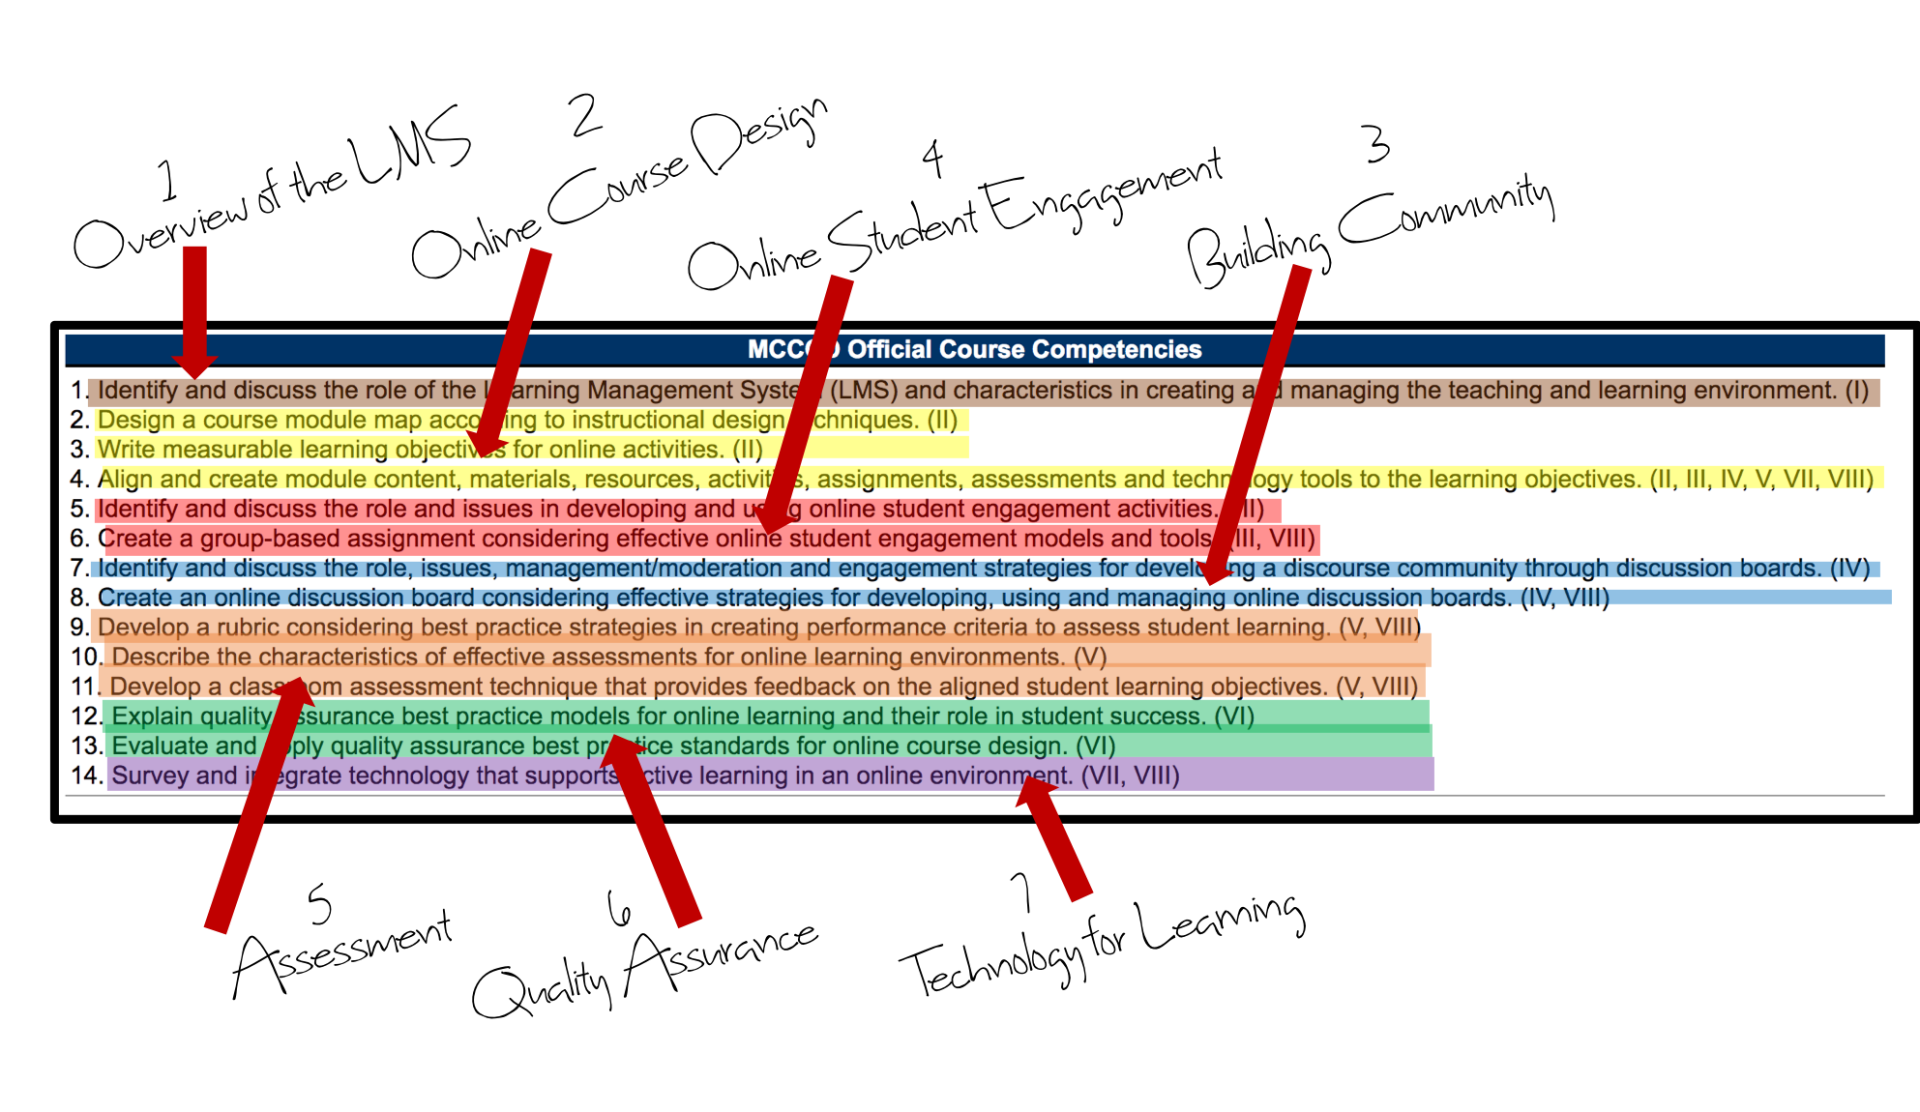
As you review competencies, consider:
- Which competencies run through the entire course?
- Which competencies naturally cluster together?
- What is a logical sequence for those clusters based on how students build understanding?
Group related competencies into 5–7 major units or themes. These will become the foundation of your course structure.
Phase 2: Design the Modules
Once your course map is established, begin planning individual modules. For each module, consider:
- What key concepts will students learn?
- What activities will help them practice or apply learning?
- What resources (readings, videos, tools) will support learning?
- What discipline-specific terminology should students learn?
- How will learning be assessed?
This stage helps you ensure that each module intentionally builds knowledge and skills aligned to the course competencies.
Concept Map
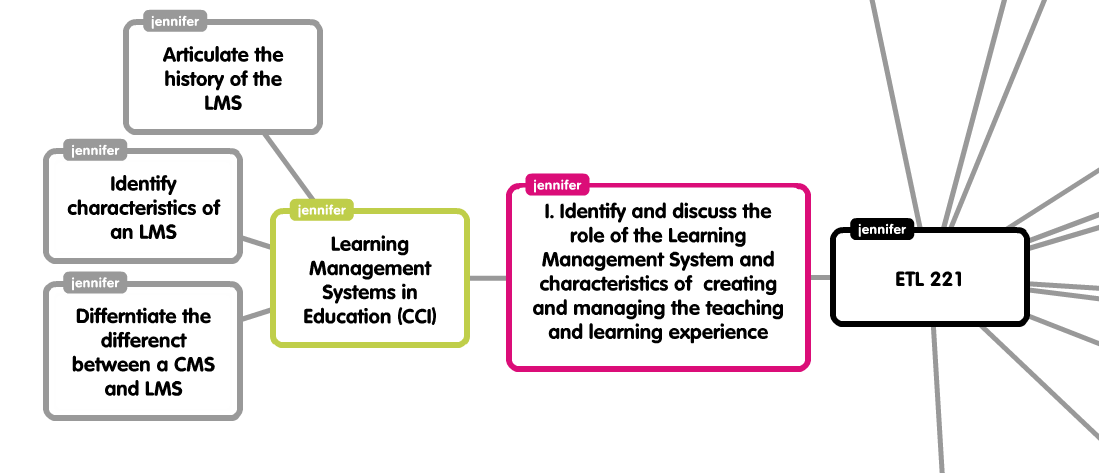
Plan for interaction! Make sure your course is rich in opportunities for students to engage with the content, with you and with each other. This means creating diverse activities like discussions, group work, case studies and collaborative problem-solving. Also, be sure to select resources that are relevant and present a variety of viewpoints and meet different learning styles. Consider multimedia, periodicals, web resources, etc.
Tip: Don’t get too caught up in specifics. This map should be an outline of the unit NOT the individual lessons.
University of Michigan, Center for Research on Teaching & Learning; Active Learning Strategies
North Carolina Index of Learning Styles Questionnaire
Phase 3: Write Clear, Measurable Learning Objectives
Strong module objectives make course design easier and help students understand expectations. Well-written objectives:
- Align directly to course competencies
- Describe observable and measurable learning
- Communicate clearly what students should know or be able to do
Begin by identifying what students must learn in each module. Then write objectives that clearly express that learning using measurable verbs.
Writing Effective Objectives
A helpful way to write clear learning objectives is to use action verbs drawn from
Bloom’s Taxonomy. Objectives should encourage deeper thinking and be specific enough that student performance can be observed and assessed.
Avoid vague verbs such as understand or appreciate. Instead, choose measurable actions such as analyze, apply, explain, or compare.
Another helpful framework is the ABCD method:
- Audience – Who is learning?
- Behavior – What will they be able to do?
- Condition – Under what conditions?
- Degree – How well must they perform?
Aim for 3–5 objectives per module. If you have more than that, the module may be too broad or focused on tasks rather than learning.
- Penn State University offers a wonderful interactive tutorial to create objectives according to the ABCD method.
- Use the University of Central Florida Objective Builder to create measurable objectives according to the ABCD method.
Phase 4: Align Activities, Materials, and Assessments
Once you have your objectives, ensure that everything in the module intentionally supports those objectives. This is where alignment becomes critical.
Alignment means:
- Learning activities support the objectives
- Assessments measure the objectives
- Materials and resources support learning toward the objectives
Ask yourself:
- Does this activity or assignment help students meet the objective?
- Does the assessment actually measure what the objective states?
- Is each reading, video, or tool essential to achieving the stated learning?
If something doesn’t align, consider:
- Revising the objective
- Adjusting the activity or assessment
- Removing or marking the material as optional enrichment
A clear alignment structure helps students focus on what matters and prevents cognitive overload.
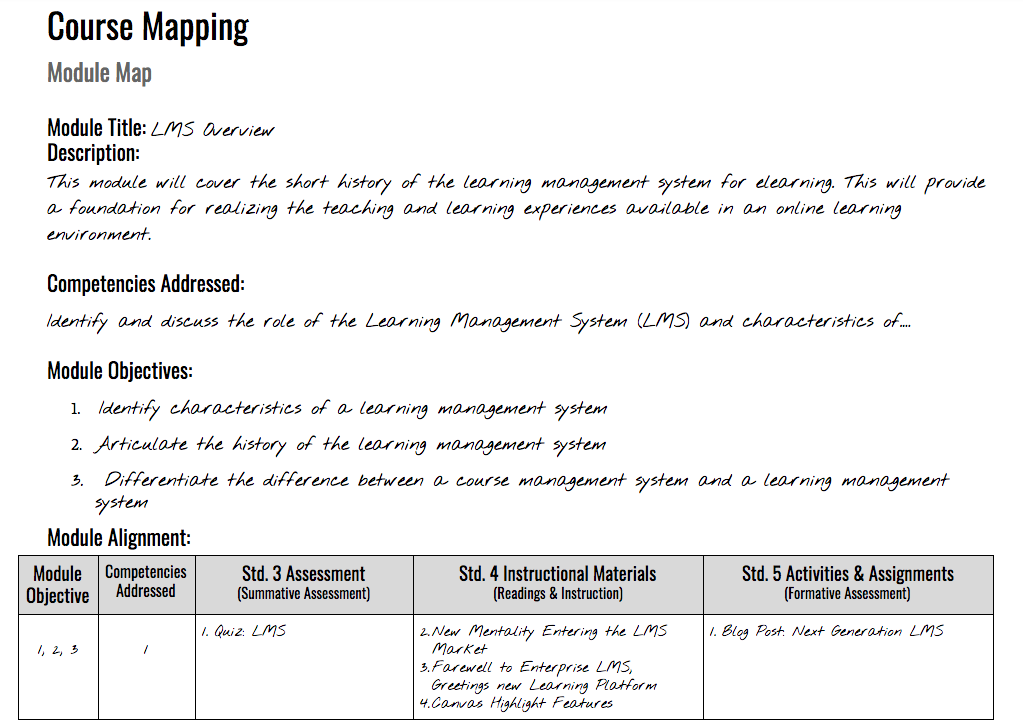
A simple way to check alignment is to create a module map that lists:
- Competencies
- Module objectives
- Learning activities
- Assessments
- Materials/resources
This ensures coherence and helps students see the purpose behind each part of the course.
Phase 5: Design Assessment for Learning
Assessment is more than grading – it’s how both you and your students gauge learning progress.
Formative and Summative Assessment
Use a mix of:
- Formative assessments (ongoing checks for understanding, low stakes, feedback-focused)
- Summative assessments (evaluations of mastery at the end of a unit or module)
Frequent low-stakes assessments help students track progress and help you adjust instruction when needed.
Classroom Assessment Techniques (C.A.T.s)
C.A.T.s are short, targeted activities designed to gauge learning in real time. They:
- Reveal student misconceptions early
- Encourage active engagement
- Provide meaningful feedback for both students and instructors
Effective C.A.T.s include:
- Planning the activity
- Implementing it intentionally
- Responding to results with adjustments or feedback
Rubrics for Clear Expectations
Rubrics help students understand expectations and support fair, consistent grading. Strong rubric criteria are:
- Aligned to learning objectives
- Observable and measurable
- Distinct and clearly defined
- Scalable across performance levels
When well-designed, rubrics guide student work, improve transparency, and reduce grading ambiguity.
Build Your Course in Canvas
You’ve done the foundational work – mapping your course, aligning objectives, designing assessments, and selecting activities. Now it’s time to build your course in the learning environment. Here are three focused strategies to help you move from planning to implementation.
Strategy 1: Explore Example Courses for Inspiration
Looking at existing courses can spark ideas about structure, pacing, interaction, and design. Review examples both within and beyond your discipline—strong design transcends content area.
Where to look:
- Preview online courses shared by colleagues or through college resources.
- Explore courses built in Canvas using the public-facing Canvas Catalog.
- Explore open courses for inspiration:
- MERLOT – peer-reviewed teaching and learning resources
- Harvard Extension School – open learning initiative courses
- MIT OpenCourseWare – free course materials from MIT
Focus less on copying and more on noticing patterns in structure, flow, interaction, and learner experience.
Strategy 2: Curate High-Quality, Aligned Materials
As you select readings, media, activities, and tools, alignment is key. Every resource should support a learning objective.
Consider:
- Open Educational Resources (OER): Freely available, openly licensed materials such as textbooks, activities, and media.
- Creative Commons resources: Images, videos, and other media available for reuse under open licenses.
- Publisher content: Textbook publishers often provide digital course materials. Select and customize only the content that aligns with your objectives.
Strategy 3: Design for Accessibility and Universal Learning
Accessibility is foundational—not optional. Ensure your course materials meet accessibility standards and are usable by all students.
But go further by designing for Universal Design for Learning (UDL)—creating flexible pathways that support a wide range of learners, technologies, and learning preferences.
Focus on:
-
- Clear organization and consistent navigation
- Readable content and accessible formats
- Multiple ways for students to engage with content and demonstrate learning
Strategy 4: Build and Teach with Canvas
Canvas is the adopted learning management system for our district. It’s designed not just to store content, but to support and facilitate learning. Canvas includes tools for multimedia, discussions, quizzes, peer review, group work, and more — and it is built around a module structure, which makes it a natural fit for the course and module mapping you’ve already done.
To get started with Canvas, you can:
- Complete the Canvas Instructor Orientation, a self-paced course that walks you through course setup and core features.
- Use the Canvas Guides, which provide searchable, step-by-step instructions for every Canvas tool.
- Use the MCC CTL Getting Started with Canvas in 10 Steps resource to quickly get your course launched.
- Attend CTL trainings or workshops to build confidence and skills with Canvas tools.
- Stay current through the CTL LMS News.
For student support, share the Canvas Student Tutorials and the Canvas 101 resource so students learn to navigate Canvas confidently — freeing you to focus on teaching rather than tech support.
Strategy 5: Use the Getting Started Module Template
A strong start matters. To help faculty launch courses with clarity and consistency, MCC provides a Getting Started Module template you can import into your course and customize. This template helps establish clear expectations, navigation, and early engagement.
How to add the module to your course:
- Enroll in the MCC Getting Started Module Canvas course to view the template.
- Download the Canvas Export Package (do not rename or unzip).
- In your Canvas course, open Settings and choose Import Course Content.
- Select Canvas Course Export Package as the content type.
- Upload the downloaded .imscc file.
- Choose Select Specific Content, then import.
- After the import finishes, choose Select Content and import only the Getting Started module.
Once imported, customize the content to fit your course, students, and teaching style.
Final Thoughts: Iteration, Reflection, and Growth
Building a strong online course takes time – and that’s okay. Your first version doesn’t need to be perfect. Teach it, reflect, gather student feedback, and refine.
We recommend:
- Including a course feedback survey at the end of the semester.
- Using student feedback to guide improvements.
- Engaging in continuous improvement through reflection and peer feedback.
- Using the Mesa+ rubric as a guide for reviewing course quality and identifying next steps.
Design + Delivery = Learning
Strong design is only part of effective teaching. Course delivery – including communication, pacing, feedback, and responsiveness — is what turns structure into learning.
Continue to explore teaching strategies, try new approaches, and build community with colleagues. High-quality teaching is an evolving practice, and your course will continue to grow with you.